Saturday, June 30, 2007

Catching up on over due work

OK, so this project isn't as over due as the last AB, this one is only a year over due! YIKES! Scarry... the poor recipient had forgotten about my owing her work in the last Round Robin I participated in! Thankfully, last July when I was to work in her book and we were going to be out of town the whole month, I discovered that she had her "book" more of a box of mini books she had made for each participant. So I just took out my mini-book and sent the whole box on to the next person with the intention of doing my work upon my return. However, that obviously didn't happen and I just recently rediscovered my mini book while cleaning out my studio. Well, today, I did it! It is completely finished and I"m so happy to have it done! Angela's theme was "your Muse: what inspires you" kind of thing and it threw me so bad because I just don't really get the whole muse thing. So, today, I decided to just go with the flow and work more intuitively, so that's what I did. I just used images that I love, colors I love, and there's nothing that inspires me more than the One who created me and knows me better than no other... Jesus. And creation inspires me... so I created. The little book is about 4x6 in size. Here's my stuff:

This is the cover. There are a few layers here and the photo doesn't capture them well at all. The over itself is a swatch of upholstery fabric. Then, hot pressed watercolor paper is adhered to it. Next, I have layers some Bible text, then a vintage image of Jesus's face printed on vellum, then, a transparency of a woman's face. I stitched all of this onto the watercolor paper with french knots. The image of Jesus is subtle but looks very cool IRL the way the two faces mesh together. The word reads "Thine".
The left side of the spread contains my favorite scripture passage: Jeremiah 28: 11-14. The right hand side is layered with hymn text, Bible text, glazes, a transfer of a church from a photo I took in Oceanside last summer. And then, the transfer of the woman's face. I was sooo disappointed that the transfer didn't turn out well. However, given that I haven't done transfers in, uh... well, I can't remember the last time, I guess I shouldn't be surprised. All of the backgroud text refers to seeking God and "seeing" so the gold text reads: I will lift up mine eyes.
These pages are layered in foreign Bible text, English Bible text, hymn text, layers of glazes, rubberstamped images, used tea bags, and then transfers. I was thrilled over the transfer on the right side. It turned out really well. There is also a cross charm on that page. All the gold text reads: (left) tender mercies, cherished (right) Hope, His beloved.
This last page is layered similar to the others. I used the actual image in this piece and the gold text reads: He who has God finds he lacks nothing: God alone suffices.
On the right, I just journaled my thoughts about the spreads. I hope Angela will be pleased.

Prayer pillow obsession


OK, so I can't seem to stop making these little things! They are addictive and so calming to do. The possibilities are endless for them. I keep trying different materials and methods and so far, I have enjoyed working with wool felt the most. It was the easiest and did not require a sewing machine. Fran had gotten a bunch of this gorgeous dyed lime green wool felt for an online class she is taking however, she's very allergic to it so guess who lucked out!!! :) And it's one of my most favorite colors! I love the hand of the wool felt. It is well behaved fabric! LOL! Now wouldn't a large bowl or basket of these little things look awsome? And they feel good in your hands too!
The patchwork type pillow was made from scraps I had already stitched together. I love that metal leaf bead! The third pillow is made from hand-dyed velvet. It is made into a small envelope sealed with an alcohol ink dyed bamboo bead wrapped with wire. It's a bummer that the photo doesn't really show the coloring in the velvet.

Friday, June 29, 2007

more fiber art


Well, after cleaning up my mess from working on Karen's book (part of my plan to keep my studio somewhat functional) I decided to make some beaded prayer pillows. I heard about them on a yahoo group and then did some research on the web. I love the idea of them. The "rule" is that they can be any small size/shape and must contain a small paper on which a prayer is written and must contain at least one bead. Did you know the word "bead" actually means prayer? Isn't that cool?! Anyway, here are 3 I did this afternoon. I swear I did not choose a color scheme... it just turned out that way! The green and tube pillows are made from more of the vintage kimono fabric. I love these two pieces. I'm hoping Katie will be bringing some to sell at Art Unraveled! The one with the woman's face is from a polyester man's shirt I snatched from Goodwill! I went right to work cutting that baby up! Isn't it wonderful? The images on the shirt are fantastic!

Home and creating

Well, I am home from our trip to Vegas and have felt like I had a hangover from sheer exhaustion. My body is still sore too! We didn't really go for a vacation but for Chuck to see a Dr. there but I did take the boys out one day and I'll talk about that later. I am just so glad to be home and Phoenix is so much prettier than Vegas!

A couple of years ago, I participated in my first altered book round robin with a storyline theme. Each participant was to start her own book with art and written story which was then added to by each participating artist. Well, as it neared it's end, my dear friend, Karen Campbell was the last one with my book and I was last with hers. We decided to take a little break and not worry about the last mailing deadline since we knew who had each other's book. Well, that "little break" turned into almost 2 years! Yes, those deadlines are a good thing, I'm thinkin'. They are highly motivating! Anyway, Karen had the opportunity to sign up for a mini-RR using an existing RR book. She wanted to use this one that has been in my possession for an ungodly amount of time. The first mailing for the book is July 1. Well, there's a deadline for me! I knew that there was no way I wanted to send this book off without having worked in it only to have it sent back to me in a few months to stare at me again! So I got a firecracker under my butt and spend all day yesterday and this morning getting my work done in this book! It had now been mailed to the first participant of the new mini-RR! YIPPEE!! I'm done! So, ya' wanna' see what I did?
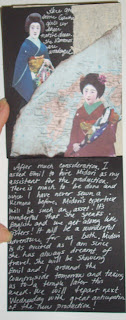
First, let me give a little background... the book has an underlying theme of Opera with the main character being Saddie, who creates costumes for the Opera's and the man she is in love with, Emil, who produces the productions. The book Karen started with is about Opera's and I decided to stick my part of the work in just before the chapter on 'Madame Butterfly'. I took the main characters to Japan on a buying trip for fabric and for Saddie to consult with a seamstress there about the construction of the kimono, etc.. I love doing oriental stuff. Maybe it's just the simplicity of things in the culture or maybe it's the memories I have of living on Okinawa. Either way, I love working with oriental things.

I decided to insert a pocket in the center of my spread using a sheer Japanese handkerchief I found in a thrift store. I added some bits of vintage kimono in with it as well. Before adhering the fabric, I painted the pages a base white and then stamped them with Japanese text. Then, using fusible web, I adhered the handkerchief to the pages. The pocket was added in by cutting down existing pages leaving tabs which the edge of the pocket was inserted between. Then, the tabs are glued shut. I stitched them using french knots which I also added to the pages. My initial writing for the story was put on a transparency and sewn to the left page with french knots. On the right page of the spread, I added sewn charms. Inside the pocket is a small booklet which I collaged having the very center of the booklet be a swatch sampler of vintage kimono fabrics sewn in! I purchase vintage kimono fabric remnants from artist Katie Kendrick. http://katiesvintagekimono.com/ In the pocket, I also included a Japanese postcard. The sign-in tags that Karen provided are slide mounts with a selection of small transparencies. I covered mine in Japanese text. I selected a transparency of a car and the put a map behind it of Japan.

Here are photos of the spread as well as the booklet.

This page featuring "Midori Ichiro" has a fold out page of vintage handwritten Japanese text. It is written on handmade paper and I've been hoarding it for a very long time. It's beautiful!


Here you can see the text page folded open.


The sign-in tags that Karen provided are slide mounts with a selection of small transparencies. I covered mine in Japanese text. I selected a transparency of a car and the put a map behind it of Japan.

Saturday, June 16, 2007

Journal clasp reworked and a special gift


Well, I got the journal clasp problem solved and it works. Not my original first choice but it works.


I also quickly made a little carry bag for Sam's Pokemon cards from a discarded cut off leg of a pair of sweatpants! It has a velcro closure and tabs to pull it open as well has little handles. Maybe now the cards won't be scattered from here to kingdom come at any given moment.


And look at this amazing, gorgeous vintage door knocker with patina done the natural way! Fran gave this to me! It's it just beyond belief? She got it off a door in her old house in Kansas! She hadn't intended to give it to me just yet but I happened to spot it on a shelf and gasped LOUDLY while grabbing it and screaming wondering where she got it! LOL! Sorry to spoil your surprise Fran but oh my, I am so in love with this piece and am looking for a special place to hang it! Thank you Fran!!!

Hand dying and other stuff


So, does anyone else use their hand for a paint palette? And I thought you might want to see what hand dying really looks like! LOLOLOL! This is the way I do things anyway!

Argghhhhh

Well, this morning, I picked up my new journal and realized I was going to get really frustrated using it because any pressure on the cover at all caused the "cool clasp" to pop open with the book spilling open. So, I thought maybe a pair of pliars would do the trick to tighten the clasp. Wrong.... it broke it! So, another idea was to stitch a piece of twill tape and velcro to slip throught the front part of the clasp. But that won't work because of the thickness of the velcro. So, I just took off the back part of the clasp with twill tape and am now going to the kitchen sink to dye up another longer piece of twill to match and will then sew it on to loop through the front clasp and tie. Not my first choice since a tie is not as clean of a look as what I'd planned but sometimes you have to change plans. And I just want this journal done because I want to take it with me when I go out of town on Monday! To the sink I go....

Friday, June 15, 2007

a few things

Well, I sorta' felt my overload "fog" lifting slightly from my brain today. I still had so much running around that I had to do today but I got in a little art time so that makes everything all better!

First, I want to show the finished basket of goodies for my friend who had surgery on Wednesday! There are also fun tags hanging on the side. Mine is made from a formica tag and it has about 5 tags behind it where I wrote notes to her. It's sorta' like a little booklet! Max and Sam also made a tag. Can you believe this girl had major surgery that took a a few hours... she had surgery at 11:00 and was HOME by 5:00!!! Isn't that insane? Not even a overnight hospital stay!


The next thing I want to show you is a little treasure I found tucked in a book amongst a stack given to me through freecycle! Can you believe a real autographed photo of Ole' Blue Eyes Himself?!!!!


I've been over at Fran's almost every day this week. She and I were both working on making journals from scratch. She helped me with the design but once I came home with most of it still to do this afternoon, I ventured on my own. I hate written instructions and fight against patterns! Anyway, I got it complete and had forgotten how much I love making books by hand. I will be doing more. I have many ideas for other journals using some of the same techniques as this one but I think I want to change the way the signatures are sewn in. I did venture from the directions with mine a bit but will completely change it next time. And this clasp is another treasure find! I found a whole package of about 6 sets of these cool hook clasps at Goodwill for less than $2.00! I just love them! Anyway, here is my complete journal!


I hope you aren't sick of pictures just yet cuz I have one more to show. I found a little bag of these small plastic birds and plastic GLOW-IN-THE-DARK cherubs... yes, you read that right... why anyone would make them to glow in the dark is beyond me. However, my boys think they are cool. Anyway, today I purchased some patina solution by Modern Options and played around with a few of them. Here are before/after results! I plan to make wire nests for the birds and create charms from them. Not sure about the cherubs yet though but they sure are improved with the patina! At least they look more like a garden decoration than a weird halloween idea gone bad! LOL!


Tuesday, June 12, 2007

First prayer stick


Well, I arted up my first prayer stick. I ran across this concept on a website and thought it was so interesting. Asian cultures as well as Native American's have used prayer sticks for centuries. The asian sticks are very simple and clean looking with no ornamentation. They are strickly nice sticks with prayers written on them. The Native American sticks, however, are full of bits of symbolism and decoration. Even the type of wood used for the stick is for a purpose. I wonder why the American culture has never thought to utilize this tool!?! I LOVE the idea of taking a stick of some kind, writing your prayer on it, decorating it with symbolic colors, symbols, trinkets, etc... and then either giving it to the person whom you are praying for, putting them in the ground (as the Japanese do... like a garden of sticks which looks amazing) or even in bundles to remind us of those things we have given to God, etc... Anyway, I want to do some of these. And, since my sweet babysitter and friend, Rachel, is having some surgery tomorrow, which she is very nervous about, I made a prayer stick for her. There is a purpose for each thing I put on the piece as well as the colors used. I will give this to her today so she will have something she can carry in her hands when she goes to the hospital tomorrow ... she'll know she's been lifted in prayer and she can actually carry a symbol of that with her as a reminder. This stick has a bamboo base dyed with alcohol inks. It measures only about 4-5 inches. The center bead says "courage" and the feather is from the Native American tradition of adding a feather to the top of the stick to symbolize the prayer being carried to God. I love the visual... and the feather is pretty and feels great too! :)

Sunday, June 10, 2007

Bamboo bead bracelet


Well, I finished the bracelet! It turned out pretty cool although I think, for myself, I'd like to try some different colors and different beads. But this one is for a teenager so I think it is appropriate!

a little bit of art today


I did a wax collage today and gosh, I love the smell of beeswax! This piece is 5x7 with a fabric base, vintage picture, sheet music, and brads. It is a gift for a friend. I also did another nest charm and am now dying bamboo beads for a bracelet. I've had the idea in my head for months and am finally going to make it. I'm waiting for varnish to dry.

Saturday, June 9, 2007

Whirlwind week

Wow, this week has been like a crazy time and I'm still foggy coming out of it. By yesterday morning, I was in "crash and burn mode" and cried for like 45 minutes. You have to know that I am a home body. I LOVE being at home and don't function well if I have to be out on the run every day. Well, this week started out with a major grocery store run, picking up a sitter for Max so I could take Sam to his first science class. That class lasts 2 hours and goes Monday - Thursday for this whole month. During that 2 hours each day, while waiting for him, I'm either eating, running errands, etc... and I did manage Starbuck's one day and popped in at Fran's one day. Anyway, on our way home, Sam and I picked up his friend Anthony who came for a playdate and dinner for the first time. They had a blast and made pizza from scratch.

Tuesday, we had my last day of Women's Bible Study until fall. Afterwards, we had just enough time to cram lunch down, pick up the sitter for Max, and get Sam to his class. On our way home that day, we picked up their friends Daniel and his younger brother Ezra. They came over for a mud play date! Well, they had a blast but I did NOT! I had asked their mom to pick them up at 5:30 and she ended up not getting here until about 6:20 and didn't leave until 7:00. I was chicken fried! And, I bathed all 4 boys, by the way, so they were clean going home. NOT an easy task!
Wednesday, I tried to catch up on my house a bit and worked on some of the disposable art pieces. Sam had his class that afternoon and I just took Max with me so we could go straight to my mom's afterwards. My niece, Cassidy was to leave Thursday morning so we went one last time to see her. I played Scrabble with my step-dad again... and won... again! :) (hehehehe)

Thursday, I finished up my disposable art pieces. (working on these was my sanity break this week!) I picked up the sitter and took Sam to his class. After we got home, then I had errands to do for Chuck. OK, so I'm nose diving at a rapid pace by Thursday night but, I quickly ran up to the church to drop off the disposable art pieces to Steve at the prayer meeting, which I did not get to attend this week. Oh, I forgot to mention that in the midst of all my crazy running and trying to keep up with the house, laundry, meals, etc... my husband has been pretty much flat on his back in excruciating pain from degenerating discs in his neck. Even the strongest narcotics aren't touching the pain. He is scheduled for a spinal injection on Wednesday and we pray this helps with the pain or we will be talking about neck surgery! YIKES!

Anyway, by yesterday morning, I was up at 5:30 and got a lot of stuff caught up before I was to pick up the sitter at 9:30. I made a date with Fran to take care of ME! Both boys were staying with the sitter. I was an hour late getting out of the house and had my major crying session, etc... I was soooo happy to get to Fran's! We worked on some birdnest charms based on one that Shirley McCutcheon sent me (see sidebar for her blog link). Well, Fran and I made several and each time trying to change things. Here is a picture of the ones I did. The first 4 just weren't looking right to me because the eggs seemed to be getting buried in wire. I finally went in the bathroom and looked at the one hanging around my neck only to realize our mistake with some of our wiring. I also was having a problems with all the wrapping wire in my hands due to arthritis in my thumbs so this was hurting me! I started changing the whole process in how these were made. In fact, it is now a very different process from the instructions Shirley sent! The last one I made was the nest on the upper right with the light green eggs. This, I feel, is my best one and it went together in a snap with no pain for me and no buried eggs! LOL! I also went to a little heavier gauge wire which holds it's shape a bit easier and requires less wire. Shirley's gorgeous, neat little nest requires about 6 feet of 24 gauge wire! I dropped to probably 4 ft. of 22 gauge. Anyway, I still need practice but am liking these. I want to go get some more pearls to use. However, using 22 gauge wire did present a problem with the size of hole in the beads so I need new beads! LOL! Thanks Shirley, for the amazing little nest that I LOVE and for the instructions! So, here are the fruits of my labor.... the bobbin is to show the size of the nests...


I have also finally figured out what a comfortable "messy" is for me in my studio. Here are some pictures I took... these messes are enough to get and keep me creating yet can be cleaned up in less than 15 minutes! This is workable for me. Totally clear tables freeze me up!


Disposable Art


I know, I know... you are wondering what the heck is disposable art, right? Well, it's art done on pieces of cardboard and put out on the street for the taking, basically. A friend of mine from church, Steve, does a ton of work with people on the streets. Homeless, prostitutes, drug addicts, etc.... and he goes out to minister to them and be "Jesus with skin on" to them. He came up with the idea of doing inspirational type pieces of art on cardboard that could be put out there for these people to take. The pieces have the message of Jesus love for them in some way. Some pieces are simply scripture verses, some are simple drawings, some collage, some are pieces of art and scripture or just words/thoughts, etc... Anyway, Steve has a friend going to Soho in London and asked Steve if he could get together some Disposable art pieces to be taken and distributed there. Here are 7 pieces I did. I think a couple of mine are going to Honduras though, instead of London. These pieces are all knock-off's of other pieces I've already done in one way or another which made them pretty quick to do. I did try a couple of new things with two of these. The piece that looks like a prison has a piece of the cardboard cut out for a window and I painted skewers and then glued them into the corregated part of the cardboard creating the prison bars. That turned out kinda' cool. And then, on the Sparrow piece, the tree branch was done by gluing a scrunched up piece of tissue paper down into the shape and then adding glazed to it. I love how that turned out and plan to use this technique again in the future.